Advertise with me..................................

Your Ads Here..................................

Just for my note..................................

You can read but don't do negative..................................

You get +, then don't do - ..................................

Showing posts with label Windows. Show all posts

How to Fix ‘File Path Too Long’ Error

7:13:00 PM | , , , , , ,


How to Fix ‘File Path Too Long’ Error While Copying, Deleting or Opening Files, Without Using Third Party Applications
Here I Fix ‘File Path Too Long’ Error While Copying, Deleting or Opening Files. ‘File Path Too Long’ Error is an error that when you try to copy something. So, it happens when you copy any file and then just try to paste it. This error stops you from the copying process and you can’t complete the process. This happens due to the pre-defined character limit and beyond this limit you cannot name any file or other stuffs. Mostly the character range is 256-260 characters. The important thing is that the character limit is for the file path and the file paths are too long if the file is too deep behind the folders and folders and hence the error occurs. Now lets see the solution to this error.

Step 1:

The first easy thing is that you just shorten the file and the folder names coming along the path to reduce the characters length.

Step 2:

Now open the command prompt and type the below command:
subst J: “the file path you want to shorten”
In above command in place of “J” you can write any drive letter.

Step 3:

Now open the J drive and just copy the data from there.
Note: Now to remove the new drive J just type subst J: /d in command prompt.
That’s it.

==================
Why does it come?
There is a pre-defined character limit beyond which you cannot name a file or folder, and it varies from one OS to another. Mostly it varies between 256 and 260 characters. This is the character limit for a file name, which excludes the file path under which it is located, like “C:\Documents and Settings\Test User\Desktop\test file.txt”. But, when you copy a file from one location, it takes into account the entire file path. So, if the file is residing under a folder which is too deep or too long, that has a length beyond the set-limit, you will get errors like the ones shown above.
How do I know that the file path length is causing the issue?
  • One way you will know is definitely from the error messages similar to the ones above which clearly mentions the problem.
  • Some other times, it won’t. You will simply get a message saying ‘Cannot Copy’ in the title.
  • Or, some other times, the files won’t open properly. They would open and close instantly without giving any errors.
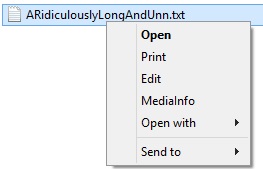
  • Also when you right-click such files, the number of options available in the right-click menu would also be limited compared to other files.
Error 4
All these are caused by those incredibly long file paths.
So, how can I copy the files or fix this issue?
There are a couple of ways you can fix this easily without the use of any 3rd party applications.
  1. Check the folder path, and shorten some of the folder names in between thereby reducing the file path length. You don’t necessarily need to put the folder name as ‘Mission Impossible Three’ when you can still recognize it as ‘MI 3.’
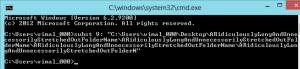
  2. The main thing many people miss when they save a file or folder their Desktop is that the actual path to that folder in desktop is either ‘C:\Documents and Settings\%username%\Desktop’ or ‘C:\Users\%username%\Desktop’ depending on your OS. So as you can see, its already longer than you thought it is. Go to Start — Run and type ‘cmd‘ and press OK, or click start/press windows key and type ‘Command Prompt‘. Once in the command prompt window, type the following command :
subst V: “C:\TheRidiculouslyLongFolderNameWhichYouDontNeedAtAll” ,
where
subst = substitute command
V = a drive letter of my choice, you can select your own.
C:\TheRidiculouslyLongFolderNameWhichYouDontNeedAtAll = the file path you want to shorten. Change it according to your situation.
Error Fix Command
So, basically this command would convert the entire folder path you provide in the command, into a single temporary drive letter, like V in this case, which gets created in My Computer. Now all you need to do is, go to the My Computer, and open the V drive, and copy the data from there.
After the Fix to File Path Error
Note : To remove the new drive from My Computer, go to Command Prompt again and type subst V: /d
Read More

GMAIL KEYBOARD SHORTCUTS CHEAT SHEET (WIN & MAC) 2017 VERSION

1:49:00 PM | , ,


WINDOWS and MAC VERSION GMAIL KEYBOARD SHORTCUTS CHEAT SHEET

Src: makeawebsitehub.com
Read More

Windows 10 keyboard shortcuts #1

1:40:00 PM | , , ,


The basics
Ctrl + A: Select all items in a window.
Ctrl + C or Ctrl + Insert: Copy selected or highlighted item (e.g. text, images and so on).
Ctrl + V or Shift + Insert: Paste selected or highlighted item.
Ctrl + X: Cut selected or highlighted item.
Ctrl + Z: Undo previous action.
Ctrl + Y: Redo action.
Ctrl + N: When File Explorer is your current window, open a new File Explorer window with the same folder path as the current window.
Windows key + F1: Open "how to get help in Windows 10" Bing search in default browser.
Alt + F4: Close the current app or window.
Alt + Tab: Switch between open apps or windows.
Shift + Delete: Delete selected item permanently (skip the Recycle Bin).Start menu and taskbar
Windows key or Ctrl + Esc: Open Start menu.
Windows key + X: Open the secret Start menu.
Windows key + T: Cycle through the apps (including pinned apps) on the taskbar.
Windows key + [Number]: Open the app pinned in the [number] position on the taskbar. For example, if you have Edge pinned in the first position on the taskbar and you click Windows key + 1, Edge will open. If the app is already open, a new instance or window will open.
Windows key + Alt + [Number]: Open the right-click menu for the app pinned in the [number] position on the taskbar.
Windows key + D: Show or hide desktop (Windows key + , will display the desktop briefly).The desktop: Windows, Snap Assist and virtual desktops
Windows key + M: Minimize all open windows.
Windows key + Shift + M: Restore minimized windows.
Windows key + Home: Minimize all windows except the selected or currently active window.
Windows key + Up arrow: Maximize selected window.
Windows key + Shift + Up arrow: Maximizes the active window vertically while maintaining its width.
Windows key + Down arrow: Minimize selected window.
Windows key + Left arrow or Right arrow: Snap selected window to the left or right half of the screen. (If the window is already there, Windows key + Up or Down will snap it into a quadrant.)
Windows key + Shift + Left arrow or Right arrow: Move selected window to the left or right monitor.
Windows key + Tab: Open Task view (virtual desktops).
Windows key + Ctrl + D: Add new virtual desktop.
Windows key + Ctrl + Right arrow: Move to the next virtual desktop (to the right).
Windows key + Ctrl + Left arrow: Move to the previous virtual desktop (to the left).
Windows key + Ctrl + F4: Close current virtual desktop.

The windows Keys
Windows key + A: Open the Action Center.
Windows key + S: Open Cortana in text mode, so you can type in the search bar. (Windows key + Q does the same thing.)
Windows key + C: Open Cortana in listening mode (similar to saying "Hey, Cortana").
Windows key + E: Open File Explorer.
Windows key + F: Open the Windows 10 Feedback Hub.
Windows key + Ctrl + F: Search for PCs on a network.
Windows key + G: Open the Game bar.
Windows key + H: Open the Share sidebar.
Windows key + I: Open the Settings menu.
Windows key + K: Open the Connect sidebar (for connecting to new Bluetooth devices or Miracast).
Windows key + L: Lock your computer.
Windows key + O: Lock screen orientation.
Windows key + P: Open presentation or projection sidebar.
Windows key + R: Open the Run window.
Windows key + U: Open Ease of Access center.
Windows key + W: open the Windows Ink Workspace for scribbling on tablets or touchscreen laptops.
Windows key + Print Screen: Take a screenshot of the entire desktop and save it to the Screenshots folder in the Pictures folder.
Windows key + (+) or (-): Zoom in and out with magnifier.
Windows key + Esc: Exit magnifier.
Command Prompt
Ctrl + C or Ctrl + Insert: Copy selected text to the clipboard.
Ctrl + V or Shift + Insert: Paste copied text inside the Command Prompt.
Ctrl + A: Select all text on current line. (If current line has no text, all text inside the Command Prompt will be selected.)
Ctrl + Up or Down: Move screen one line up or down.
Ctrl + F: Search Command Prompt via Find window.
Ctrl + M: Enter Mark mode (allows you to select text with mouse). Once Mark mode is enabled, you can use the arrow keys to move the cursor around.
Shift + Up or Down: Move cursor up or down one line and select text.
Shift + Left or Right: Move cursor left or right one character and select text.
Ctrl + Shift + Left or Right: Move cursor left or right one word and select text.
Shift + Page Up or Page Down: Move cursor up or down one screen and select text.
Shift + Home or End: Move cursor to beginning or end of current line and select text.
Ctrl + Shift + Home/End: Move cursor to beginning or end of screen buffer and select text and beginning or end of Command Prompt's output.
Read More

HDMI Output Problems in Windows

11:24:00 AM | , , , , ,

If you upgrade/downgrade your system and getting trouble with your HDMI output,

Rollback to the older driver

Open Device Manager and find the driver that is giving you trouble.
Right click it and choose Rollback driver to install the previous version of the driver.

Sometimes, it’s better to use the default driver than the newer version of driver. (sometimes, your system do not support newer of latest driver.) 

To use the default driver you’ll need to uninstall the current one you’re using and the default one will install itself. To uninstall the driver, do this:
  1) Open Device manager and find the buggy driver.
  2) Right click it and choose Uninstall.
  3) Check Delete the driver software for this device and click OK.
  4) Restart your computer.

(or)

Sometimes, your driver is getting old and you need to update a newer or latest version.

Read More

How To Fix Operating System Not Found or Missing Operating System

5:26:00 AM | , ,

Step 1:

Step 2:

Attach bootable USB or DVD into your computer.

Step 3:

After step 2 using the function keys (F2, F12 and Delete) enter the BIOS setup.

Step 4:

Then click on Repair Your Computer below the Install Now button.

Step 5:

In Repair Your Computer Open CMD (Command Prompt).

Step 6:

In CMD type “diskpart” then type “list volume”

Step 7:

In list volume, all volumes are shown, then find your system volume where the windows are installed and type “select volume ###“(system volume C) shows on CMD. Ex. select volume 3

Step 8:

After selection of volume, type “ACTIVE“. Your system partition is active now. Type ”exit” to leave diskpart and again ”exit” to close cmd. That’s it now RESTART your computer.

Conclusion

Above solution is working 100% if you follow steps correctly. If you have problem during following above steps, then please comment below.
Read More

How to Use Zawgyi-One Font on Windows 8+

5:57:00 PM | , ,

  1. First download Zawgyi One Font and Zawgyi Typing keyboard from the link below. 
  2. Install Zawgyi One Font and Zawgyi typing Keyboard Setup.
  3. Then, install  IEZawGyiGtalkfont
  4. Control Panel >> All Control Panel Items >>> Language ... 
  5.  Go to Advaced Settings >>> click here for more>>>

Read More

Network reset with commands prompt - Windows 7

5:37:00 AM | ,

The following is a list of the Netsh commands you can use to reset your Windows 7 network adapter:
Restores the Windows Firewall with Advanced Security policy to the default policy. The current active policy can be optionally exported to a specified file. In a Group Policy object, this command returns all settings to notconfigured and deletes all connection security and firewall rules.netsh advfirewall reset
Resets the BranchCache service. Flushes the local cache. Every configuration parameter of BranchCache will be reset to its default value.netsh branchcache reset
Resets TCP/IP and related components to a clean state.netsh int ip reset c:\resetlog.txt
Resets IPv6 configuration state.netsh int ipv6 reset
Resets Winsock Catalog to a clean state. All Winsock Layered Service Providers which were previously installed must be reinstalled. This command does not affect Winsock Name Space Provider entries.netsh winsock reset
Read More

Windows 7 Command Prompt Commands

9:42:00 AM | , ,

An A-Z Index of the Windows CMD command line

   ADDUSERS Add or list users to/from a CSV file
   ADmodcmd Active Directory Bulk Modify
   ARP      Address Resolution Protocol
   ASSOC    Change file extension associations•
   ASSOCIAT One step file association
   AT       Schedule a command to run at a specific time
   ATTRIB   Change file attributes
b
   BCDBOOT  Create or repair a system partition
   BCDEDIT  Manage Boot Configuration Data
   BITSADMIN Background Intelligent Transfer Service
   BOOTCFG  Edit Windows boot settings
   BROWSTAT Get domain, browser and PDC info
c
   CACLS    Change file permissions
   CALL     Call one batch program from another•
   CERTREQ  Request certificate from a certification authority
   CERTUTIL Utility for certification authority (CA) files and services
   CD       Change Directory - move to a specific Folder•
   CHANGE   Change Terminal Server Session properties
   CHKDSK   Check Disk - check and repair disk problems
   CHKNTFS  Check the NTFS file system
   CHOICE   Accept keyboard input to a batch file
   CIPHER   Encrypt or Decrypt files/folders
   CleanMgr Automated cleanup of Temp files, recycle bin
   CLIP     Copy STDIN to the Windows clipboard
   CLS      Clear the screen•
   CMD      Start a new CMD shell
   CMDKEY   Manage stored usernames/passwords
   COLOR    Change colors of the CMD window•
   COMP     Compare the contents of two files or sets of files
   COMPACT  Compress files or folders on an NTFS partition
   COMPRESS Compress one or more files
   CONVERT  Convert a FAT drive to NTFS
   COPY     Copy one or more files to another location•
   Coreinfo Show the mapping between logical & physical processors
   CSCcmd   Client-side caching (Offline Files)
   CSVDE    Import or Export Active Directory data 
d
   DATE     Display or set the date•
   DEFRAG   Defragment hard drive
   DEL      Delete one or more files•
   DELPROF  Delete user profiles
   DELTREE  Delete a folder and all subfolders
   DevCon   Device Manager Command Line Utility 
   DIR      Display a list of files and folders•
   DIRQUOTA File Server Resource Manager Disk quotas
   DIRUSE   Display disk usage
   DISKPART Disk Administration
   DISKSHADOW Volume Shadow Copy Service
   DISKUSE  Show the space used in folders
   DOSKEY   Edit command line, recall commands, and create macros
   DriverQuery Display installed device drivers
   DSACLs   Active Directory ACLs
   DSAdd    Add items to active directory (user group computer) 
   DSGet    View items in active directory (user group computer)
   DSQuery  Search for items in active directory (user group computer)
   DSMod    Modify items in active directory (user group computer)
   DSMove   Move an Active directory Object
   DSRM     Remove items from Active Directory
e
   ECHO     Display message on screen•
   ENDLOCAL End localisation of environment changes in a batch file•
   ERASE    Delete one or more files•
   EVENTCREATE Add a message to the Windows event log
   EXIT     Quit the current script/routine and set an errorlevel•
   EXPAND   Uncompress CAB files
   EXTRACT  Uncompress CAB files
f
   FC       Compare two files
   FIND     Search for a text string in a file
   FINDSTR  Search for strings in files
   FOR /F   Loop command: against a set of files•
   FOR /F   Loop command: against the results of another command•
   FOR      Loop command: all options Files, Directory, List•
   FORFILES Batch process multiple files
   FORMAT   Format a disk
   FREEDISK Check free disk space
   FSUTIL   File and Volume utilities
   FTP      File Transfer Protocol
   FTYPE    File extension file type associations•
g
   GETMAC   Display the Media Access Control (MAC) address
   GOTO     Direct a batch program to jump to a labelled line•
   GPRESULT Display Resultant Set of Policy information
   GPUPDATE Update Group Policy settings
h
   HELP     Online Help
   HOSTNAME Display the host name of the computer
i
   iCACLS   Change file and folder permissions
   IEXPRESS Create a self extracting ZIP file archive
   IF       Conditionally perform a command•
   IFMEMBER Is the current user a member of a group
   IPCONFIG Configure IP
   INUSE    Replace files that are in use by the OS
l
   LABEL    Edit a disk label
   LOGMAN   Manage Performance Monitor logs
   LOGOFF   Log a user off
   LOGTIME  Log the date and time in a file
m
   MAKECAB  Create .CAB files
   MAPISEND Send email from the command line
   MBSAcli  Baseline Security Analyzer
   MEM      Display memory usage
   MD       Create new folders•
   MKLINK   Create a symbolic link (linkd) •
   MODE     Configure a system device COM/LPT/CON
   MORE     Display output, one screen at a time
   MOUNTVOL Manage a volume mount point
   MOVE     Move files from one folder to another•
   MOVEUSER Move a user from one domain to another
   MSG      Send a message
   MSIEXEC  Microsoft Windows Installer
   MSINFO32 System Information
   MSTSC    Terminal Server Connection (Remote Desktop Protocol)
n
   NET      Manage network resources
   NETDOM   Domain Manager
   NETSH    Configure Network Interfaces, Windows Firewall & Remote access
   NBTSTAT  Display networking statistics (NetBIOS over TCP/IP)
   NETSTAT  Display networking statistics (TCP/IP)
   NLSINFO  Display locale information (reskit).
   NLTEST   Network Location Test (AD)
   NOW      Display the current Date and Time 
   NSLOOKUP Name server lookup
   NTBACKUP Backup folders to tape
   NTDSUtil Active Directory Domain Services management
   NTRIGHTS Edit user account rights
   NVSPBIND Modify network bindings
o
   OPENFILES Query or display open files
p
   PATH     Display or set a search path for executable files•
   PATHPING Trace route plus network latency and packet loss
   PAUSE    Suspend processing of a batch file and display a message•
   PERMS    Show permissions for a user
   PERFMON  Performance Monitor
   PING     Test a network connection
   POPD     Return to a previous directory saved by PUSHD•
   PORTQRY  Display the status of ports and services
   POWERCFG Configure power settings
   PRINT    Print a text file
   PRINTBRM Print queue Backup/Recovery
   PRNCNFG  Configure or rename a printer
   PRNMNGR  Add, delete, list printers and printer connections
   ProcDump Monitor an application for CPU spikes
   PROMPT   Change the command prompt•
   PsExec     Execute process remotely
   PsFile     Show files opened remotely
   PsGetSid   Display the SID of a computer or a user
   PsInfo     List information about a system
   PsKill     Kill processes by name or process ID
   PsList     List detailed information about processes
   PsLoggedOn Who's logged on (locally or via resource sharing)
   PsLogList  Event log records
   PsPasswd   Change account password
   PsPing     Measure network performance
   PsService  View and control services
   PsShutdown Shutdown or reboot a computer
   PsSuspend  Suspend processes
   PUSHD    Save and then change the current directory•
q
   QGREP    Search file(s) for lines that match a given pattern
   Query Process / QPROCESS  Display processes
   Query Session / QWinsta   Display all sessions (TS/Remote Desktop)
   Query TermServer /QAppSrv List all servers (TS/Remote Desktop)
   Query User    / QUSER     Display user sessions (TS/Remote Desktop)
r
   RASDIAL  Manage RAS connections
   RASPHONE Manage RAS connections
   RECOVER  Recover a damaged file from a defective disk
   REG      Registry: Read, Set, Export, Delete keys and values
   REGEDIT  Import or export registry settings
   REGSVR32 Register or unregister a DLL
   REGINI   Change Registry Permissions
   REM      Record comments (remarks) in a batch file•
   REN      Rename a file or files•
   REPLACE  Replace or update one file with another
   Reset Session  Delete a Remote Desktop Session
   RD       Delete folder(s)•
   RMTSHARE Share a folder or a printer
   ROBOCOPY Robust File and Folder Copy
   ROUTE    Manipulate network routing tables
   RUN      Start | RUN commands
   RUNAS    Execute a program under a different user account
   RUNDLL32 Run a DLL command (add/remove print connections)

s
   SC       Service Control
   SCHTASKS Schedule a command to run at a specific time
   SET      Display, set, or remove session environment variables•
   SETLOCAL Control the visibility of environment variables•
   SetSPN   Edit Service Principal Names
   SETX     Set environment variables
   SFC      System File Checker 
   SHARE    List or edit a file share or print share
   ShellRunAs Run a command under a different user account
   SHIFT    Shift the position of batch file parameters•
   SHORTCUT Create a windows shortcut (.LNK file)
   SHUTDOWN Shutdown the computer
   SLEEP    Wait for x seconds
   SLMGR    Software Licensing Management (Vista/2008)
   SORT     Sort input
   START    Start a program, command or batch file•
   STRINGS  Search for ANSI and UNICODE strings in binary files
   SUBINACL Edit file and folder Permissions, Ownership and Domain
   SUBST    Associate a path with a drive letter
   SYSMON   Monitor and log system activity to the Windows event log
   SYSTEMINFO List system configuration
t
   TAKEOWN  Take ownership of a file
   TASKLIST List running applications and services
   TASKKILL End a running process
   TELNET   Communicate with another host using the TELNET protocol
   TIME     Display or set the system time•
   TIMEOUT  Delay processing of a batch file
   TITLE    Set the window title for a CMD.EXE session•
   TLIST    Task list with full path
   TOUCH    Change file timestamps    
   TRACERT  Trace route to a remote host
   TREE     Graphical display of folder structure
   TSDISCON Disconnect a Remote Desktop Session
   TSKILL   End a running process
   TSSHUTDN Remotely shut down or reboot a terminal server
   TYPE     Display the contents of a text file•
   TypePerf Write performance data to a log file
   TZUTIL   Time Zone Utility
v
   VER      Display version information•
   VERIFY   Verify that files have been saved•
   VOL      Display a disk label•
w
   W32TM    Time Service
   WAITFOR  Wait for or send a signal
   WEVTUTIL Clear event logs, enable/disable/query logs
   WHERE    Locate and display files in a directory tree
   WHOAMI   Output the current UserName and domain
   WINDIFF  Compare the contents of two files or sets of files
   WINRM    Windows Remote Management
   WINRS    Windows Remote Shell
   WMIC     WMI Commands
   WUAUCLT  Windows Update
x
   XCACLS   Change file and folder permissions
   XCOPY    Copy files and folders
   ::       Comment / Remark•
Commands marked • are Internal commands only available within the CMD shell.
All other commands (not marked with •) are external commands.
External commands may be used under the CMD shell, PowerShell, or directly from START-RUN.   Technology Lists
Read More

Windows Host Process Rundll32 has stopped working

2:52:00 PM | , ,

Windows Host Process Rundll32 has stopped working
If you get this error message frequently, here are a few troubleshooting steps you may try:
1] First and foremost, ensure that your Windows is fully updated.
2] If you get the error when opening folders that contain video files, turn off thumbnails view and see if it helps:
Open Control Panel > Folder Options > Always show Icons, Never Thumbnails
3] Try to remember, when did this error start popping up.
Was it after installing a particular program? Was it after installing, say, Nero ? if yes try this:
Open Computer > System Drive > Program files > Common Files > Ahead > DSfilter. Rename “NeroVideoProc.ax” to say “1NeroVideoProc.ax”. Also rename “NeVideo.ax” to say “1NeVideo.ax”
Reboot.
Maybe you could update or uninstall Nero software and see if it helps.
4] The Intel ViiV software and the K-Lite Codec Pack too are known to cause this problem. If you have installed any of them, update them or uninstall them and see if it helps.
5] Follow these steps to try and find out, which software is causing this issue.
Run msconfig to open up the System Configuration Utility window. Click on Services, and check in the “Hide all Microsoft services” check box. Click on “Disable All” button.
Now click on “Startup” tab, and then click on “Disable All” button again. Press OK button and then “Restart” button on the following window.
Effectively, you have turned off all non-Microsoft services and start ups.
If the issue is resolved, open System Configuration Windows again and then enable all the services from Services tab and then check the issue after restarting the computer in the same way as mentioned above disabling one service at a time.
6] Turn off Data Execution Prevention and see if it helps. But remember that this is a security feature that is there to help protect your computer.
7] Run the Microsoft Windows File and Folder Troubleshooter and see if it helps.
This way, you will have to enable/disable services and start ups to narrow down on the culprit. Agreed, this is a lengthy and painfully boring process, but it will help you identify the culprit.
Read More

How to Fix DNS Server is not responding on Windows 7, 8

5:21:00 PM | , ,

When you try to connect to the Internet, the connection might fail when we run the Troubleshooter, and you might get this error: The device or resource (DNS server) is not responding. The exact error would be:
You computer appears to be correctly configured, but the device or resource (DNS server) is not responding.
11 FIX: DNS Server is not responding on Windows 7 | 8

DNS Server is not responding

In such a scenario, there are few things you could try to resolve it.
1.       First backup your Router settings and update the Firmware of your Router. Check the Router manual for more information
2.       Next thing is to change the DNS server address manually.
  • Go to Start and Click on Control Panel
  • Open up Network and Internet and go to the Network and Sharing Center.
  • Click on Change adapter settings

2 FIX: DNS Server is not responding on Windows 7 | 8
  • Now you’ll see the list of Network adapters select the Network adapter  that your using and right click on it and go to properties
31 600x379 FIX: DNS Server is not responding on Windows 7 | 8
  • Then Click on “Internet Protocol Version 4 (TCP/IPv4)
  • You’ll see the Internet Protocol Properties
41 FIX: DNS Server is not responding on Windows 7 | 8
  • Select “Use the Following DNS server address:
  • Enter the Preferred DNS address:   208.67.222.222
  • Enter the Alternative DNS address: 208.67.220.220
  • Then select on Validate settings upon exit.
511 FIX: DNS Server is not responding on Windows 7 | 8
  • Click OK, and then Close to finish.
3.       Now you have to enter the same DNS address in Router configuration as well refer the router manual for more information.
4.       Try to Install and Configure OpenDNS and see if that helps
5.       Next step is entering the Physical address in the Network adapter setting
  • Go to Start and type in CMD and Hit Enter
  • In command prompt type in IPCONFIG /ALL
  • Then look for your network adapter
51 600x194 FIX: DNS Server is not responding on Windows 7 | 8
  • Then right down the Physical address according to this screenshot it’s 78-DD-08-F1-DF-B0
  • Then go to Start and type in NCPA.CPL
  • Then Right Click on your Network adapter and go to Properties
61 FIX: DNS Server is not responding on Windows 7 | 8

  • Then select Configure

7 FIX: DNS Server is not responding on Windows 7 | 8
  • Then Click on Advance Tab and select Network address
  • Select the radial button Value
  • Type in the physical address you wrote down before
  • i.e. 78-DD-08-F1-DF-B0 (Remove the dashes when you type in i.e. 78DD08F1DFB0
  • Then Click Ok and Reboot the System.
6.       Next step is to look up your Network adapter model and go to the manufactures website and find the appropriate drivers and update the Drivers and see if that resolves your issue.
7.       Disable your Firewall settings completely and see if that blocks your connection.
Read More

How to fix Network problem: DNS server not detected?

7:56:00 PM | ,

For DNS server follow the below steps and check for any errors listed in event viewer–

a. Click Start. Type cmd in the Start Search box, and then press ENTER.

b. At the command prompt, type the following command, and then press ENTER:

ipconfig /flushdns (there is a space between ipconfig and / )

It will show the message successfully flushed the DNS resolver cache.
Read More

How to Repair Windows Errors?

2:48:00 PM | , , , , ,

Problem: If you do not maintain your PC on regular basis, many PC errors may occur such as windows crashes, slow performance and error messages. Regular PC usage, continue installing and uninstalling software, accumulates junk on your PC which badly affects Windows's smooth operation and performance.

Solution: In order to fix these errors and avoid them in future, it is recommended to use Windows Repair Tool regularly. Perform your routine Windows maintenance tasks easily and automatically with it and make PC stable and faster.
Download windows repair toolDownload Windows Repair Tool
Compatibility: Windows 8, 7,Vista, XP, ME, 2000 (32/64)
Download File Size: 4.1 MB, Download Time: 2sec on dsl, 2min on dial-up

Diagnose & Fix your PC problems in 3 simple steps:
1.Click here to download Windows repair tool.
2.Double click on the setup file and follow the on-screen instructions to install the product.
3.Run a Scan and fix the detected errors by clicking the "Fix All" button.
Download now
McAfee SECURE sites help keep you safe from identity theft, credit card fraud, spyware, spam, viruses and online scams

Windows Repair Tool helps:
This software is designed to diagnose your PC problems and repair them quickly. It scans your PC and finds the problems and effectively fixes them.
Read More

Why is my screen black when I start Windows 7?

10:15:00 PM | , ,

Video adapter problems are the most common cause of this issue.
Try the following troubleshooting procedures, in order. If the steps in the first procedure don't fix the problem, move on to the next procedure.

Reinstall your video driver

  1. Right-click the taskbar, and then click Start Task Manager.
  2. Click the Processes tab, click explorer.exe, and then click End Process.
  3. Click File, and then click New Task (Run).
  4. In the Open text box, enter explorer.exe, and then click OK.
  5. Click the Start button Picture of the Start button, enter device manager in the search box, and then, in the search results, click Device Manager.
  6. Double-click Display adapters, right-click your display device, click Update Driver Software, and then follow the steps in the wizard that appears.

Note

  • After the driver is reinstalled, you might need to restart your computer again to complete the installation. You might also need to adjust the screen resolution to its previous setting. For more info, see Change your screen resolution.
If these steps solved the problem, you're done. If not, go on to the next set of steps.

Check for registry issues

  1. Right-click the taskbar, and then click Start Task Manager.
  2. Click the Processes tab, click explorer.exe, and then click End Process.
  3. Click File, and then click New Task (Run)
    In the Open text box, enter explorer.exe, and then click OK.
  4. Click the Start button Picture of the Start button, enter regedit in the search box, and then, in the search results, click regedit.exe.
  5. Browse to the following registry key: HKEY_LOCAL_MACHINE\SOFTWARE\Microsoft\Windows NT\CurrentVersion\Winlogon
  6. Click to select the WinLogon key, and then, in the right pane, click Shell. The value of Shell in the Data column should be explorer.exe. If the value of Shell isn't explorer.exe, double-click Shell, and then, in the Value datatext field, enter explorer.exe, and then click OK.
  7. Close the registry editor, and then restart your PC.
If these steps solved the problem, you're done. If not, go on to the next set of steps.

Start the computer in safe mode and run System Restore

  1. Click the Start button Picture of the Start button, click the arrow next to Shut Down, and then click Restart.
  2. Do one of the following:
    • If your computer has a single operating system installed, press and hold the F8 key as your computer restarts. You must press F8 before the Windows logo appears. If the Windows logo appears, try again by waiting until the Windows logon prompt appears, and then shutting down and restarting your computer.
    • If your computer has more than one operating system, use the arrow keys to highlight the operating system you want to start in safe mode, and then press F8.
  3. On the Advanced Boot Options screen, use the arrow keys to highlight Safe Mode, and then press Enter.
  4. Log on to your computer with a user account that has administrator rights. When your computer is in safe mode, you'll see the words Safe Mode in the corners of your monitor.
  5. Click the Start button Picture of the Start button, type "system restore" in the search box, click System Restore, and then click NextAdministrator permission required If you're prompted for an administrator password or confirmation, type the password or provide confirmation.
  6. Choose a restore point when your PC worked as expected, click Next, and then click Finish.
  7. Restart your computer normally.
If these steps solve the problem, you're done. If not, try repeating the steps and selecting an older restore point (if one is available). If that still doesn't solve the problem, contact your computer manufacturer or technical support for further assistance.
Read More