Advertise with me..................................

Your Ads Here..................................

Just for my note..................................

You can read but don't do negative..................................

You get +, then don't do - ..................................

Showing posts with label Content. Show all posts

How to Remove BIOS Password

1:30:00 AM |

As it is known to us, BIOS password is useful in protecting computer safety and can stop other people from changing BIOS setting as well as booting the computer system. However, what should we do if we forgot the BIOS password to our computers? This article will recommend the following 3 ways to remove BIOS password.

Way 1: Removing the CMOS Battery with the 4 steps below.

Step 1: Turn of the computer, and unplug the power cable.
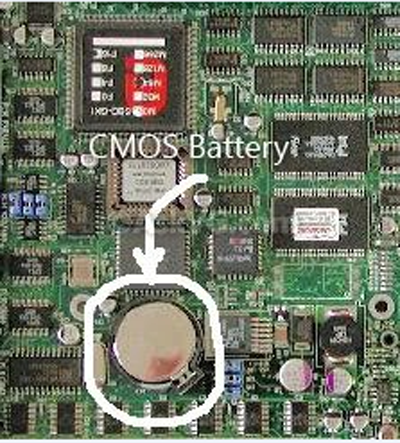
Step 2: Open the computer host, locate the motherboard, and find out the small coin sized silver CMOS battery as the following picture shows.
locate-cmos-battery
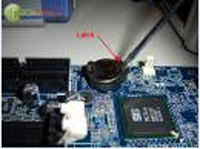
Step 3: Remove the CMOS Battery carefully if it is not soldered to the motherboard, and put it back after 10-30 minutes.
remove-bios-battery
Step 4: Boot the computer. If the “CMOS Checksum Error-Defaults Loaded” message is displayed, it indicates that the BIOS password has been reset.

Way 2: Adjusting the Motherboard Jumper as the steps below.

Step 1: Find out the Motherboard Jumper by reading the motherboard manual, or look for the Jumper labeled as CLR, CLEAR, CLEAR CMOS, etc. FYI, there are 3 pins and the Jumper will joining the center pin with left pin or right pin.
Step 2:     Move the Jumper to join the center pin to another pin. That is, if the center pin is joining with the left pin, and move the Jumper to join the center pin to the right pin.
Step 3: Move the Jumper to connect the center pin with the original pin again after a few seconds.

Way 3: Using BIOS backdoor password. And Dell computer is taken as an instance here.

Step 1: Start the Dell computer, and immediately press F2 in a continuous way to enter the BIOS.
Note: As to other brand computers’ BIOS backdoor passwords, you can search them in the internet because they are changed at times by their manufacturers.
Step 2: Type Dell into the “BIOS Password” prompt interface and hit Enter.  Then you will be taken to the main BIOS screen.
Step 3: Select Restore Defaults from the BIOS menu and press Enter. This step will restore your BIOS back to its original settings.
Step 4: Choose Save Changes and Exit, and hit Enter.
All in all, the 3 ways above are helpful for removing the BIOS password. If you do forget the BIOS password to your computer, you can choose one of three ways to remove it so that you can enter the Windows system interface and start the computer again.
Read More

4 Ways To Factory Reset Your Windows Computer

1:14:00 AM |

Starting a recovery via the recovery partition usually means that you have to press one of the “F” keys (such as F1-F12) the moment after you hit the power button. These should be:
  • Acer – Alt + F10
  • Asus – F9
  • Dell/Alienware – F8
  • HP – F11
  • Lenovo – F11
  • MSI – F3
  • Samsung – F4
  • Sony – F10
  • Toshiba – 0 (not numpad) while turning on, release key when Toshiba logo appears
Read More

Factory Reset Laptop When Laptop Couldn’t Boot Properly

1:02:00 AM |

If your laptop has met some problems that prevent Windows booting properly, you have to start laptop to run recovery procedure from boot menu. Different laptop manufacturers offer different F keys to enter the boot menu.
enter-windows-boot-menu
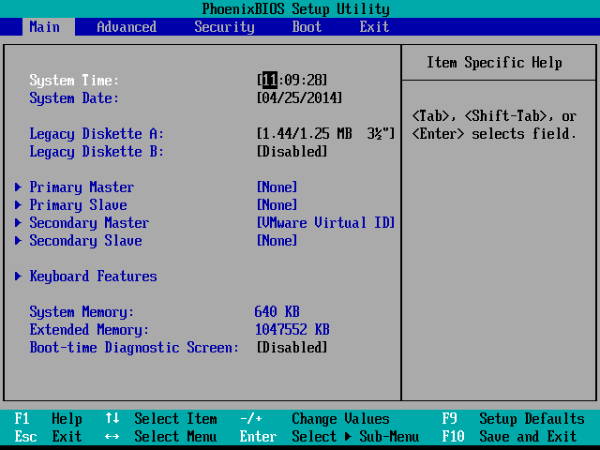
In the BIOS screen, you could see there is one kind of F key provided for laptop to restore system to default settings. Press F9 and a dialog “Setup Configuration” pops up.
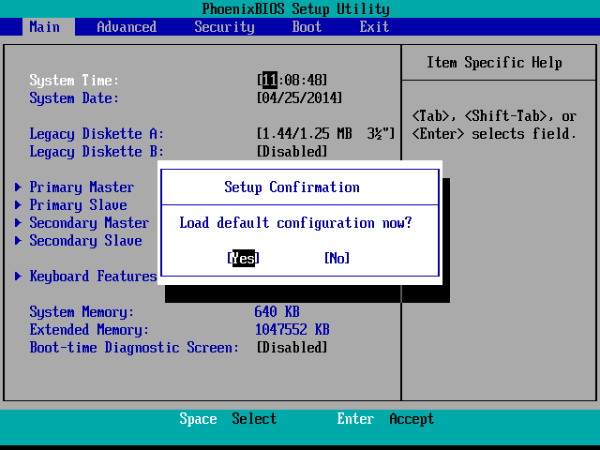
load-system-default-settings
Choose “Yes” when it ask “Load default configuration now?”. And then wait for Windows load system default settings.
And when Windows 8 laptop encounters such functional problems, it would typically open the Automatic Repair screen, which allows you to attempt to repair the damage from there and move on to restore system to factory settings.
If all of the above couldn’t work for your laptop, you would need backup disc to restore system to early backup point.
Read More

How to set computer boot from USB drive

12:59:00 AM |

Method 1: Set computer Boot from USB device by Boot Menu

Guide to set your computer boot from USB drive:
Step 1: Insert USB flash drive to computer.
Step 2: Power on or restart computer. When vendor logo appears on screen, press Boot Option Key repeatedly until Boot Option Menu appears. You can find the Boot Option Key for your computer from the following table.
Step 3: When Boot Menu appears, choose USB drive to boot your computer. Tips: Boot Menu may show your USB drive as USB HDD or other name. You can try again to get the right one.
Tips: However, for pre-installed Windows 8 computers, probably they could not enter Boot Menu successfully after you press Boot option key because of UEFI. Now we have to first disable some settings in BIOS. There would be differences for different computers. Now take Lenovo ThinkPad as example, other computers tips following Tipsin table below. 
1. Disable Secure Boot in Security after you enter BIOS window with BIOS/UEFI key. 
2. Set UEFI/Legacy Boot as Both, and choose UEFI First in UEFI/Legacy Boot Priority. Or choose UEFI Onlyin Startup - UEFI/Legacy Boot, and set CSM as YES. 
3. Press F10 to save setting changes, restart computer and enter BIOS menu with Boot option key in the following table. 
Systems supporting for UEFI boot: Windows 7/8/Server 2012 64 bit, openSUSE/ubnutu/Linux 64 bit.

Boot Option Key for different computer: 
Mainboard VendorLaptopDesktop computer
BrandBoot KeysBrandBoot Keys TipsBrandBoot KeysTips
AsusF8LenovoF12, F10, Novo button, F12+Fn+F11 LenovoF12, F8, F10 
GigabyteF12AcerEsc, F12, F9The "F12" must be enabled in BIOS.HPF12, EscPress Esc, then F9 for Boot Menu.
MSIF11AsusESC, F8Disable "Fast Boot" and "Secure Boot Control" in order to boot from MBR formatted media.AcerF12 
BiostarF9HPESC, F9Press Esc, then F9 for Boot Menu. Select "Patriot Memory" on the Boot Option Menu.DellF12 
SoyoESC, F12ThinkpadF12First disable "Secure Boot", and choose "UEFI Only" and set CSM as "Yes in "UEFI/Legacy Boot".AsusF8 
ColorfulESC, F11DellF12First disable "Secure Boot" and change "Boot List option" as "Legacy", enable "Load Legacy Option Rom"BenqF8 
IntelF10SamsungF12, Esc, F2Must first disable fast boot in BIOS/UEFI to boot from USB drive or use F2 boot menu.Tsinghua TongfangF12 
OndaF11ToshibaF12Change "AHCI" as "complete" in Boot> Advanced> System. FounderF12 
UNIKAESCIBMF12 HaseeF12 
ASLF10GatewayF12 FounderF12 
AsrockF11GigabyteF12 HaierF12 
FoxconnESC, F12BenqF9 CompadEsc, F9 
GamenF11, F12SonyF11, ESC, F10Enable "External Drive Boot" in "Advanced" first.FujitsuF12 
TopstarF11, F12FujitsuF12The "F12" must be enabled in BIOS.   
YestonF8MSIF11    
CTHIMF12eMachinesF12    
JetwayESCHasee F12    
EliteESC, F11Tsinghua Tongfang F12    
MaxsunESCFounderF12    
  HaierF12    
  CompadEsc, F9    
 

Examples: 

Example 1. Set Dell laptop or computer boot from USB Drive.
Insert the USB stick into a USB port and start or restart computer. When  F12 = Boot Menu appears in the upper-right corner of the screen, press <F12>. When Boot Option Menu appears, choose USB stick to boot from.
Example 2. Set HP laptop to boot from USB flash drive.
Insert USB memory stick to computer and start or restart HP computer. When HP Logo appears on screen, press F9 to enter BOOT MENU (Boot Device Options), and then choose USB memory stick to boot from.
Example 3. Set Acer laptop to boot from USB flash drive.
Insert USB memory stick to Acer laptop and start or restart Acer laptop. When Acer logo appears on screen, press F12 to enter Boot Device Options, and then choose USB memory stick to boot from.
Note: For traditional BIOS, follow the examples above to set Dell/HP/Acer laptop boot from USB flash drive is OK. But for UEFI BIOS, some settings should be disabled or enabled first in BIOS (follow "Tips" in above table ), then we can set laptop or desktop boot from USB flash drive successfully with boot keys. 

Method 2: Set USB drive as first Boot device Priority in BIOS.

If you choose this way to set your computer to boot from USB drive, you just need 3 or 4 steps:
Step 1. Insert USB flash drive to the computer.
Step 2. When power on or restart your computer, press BIOS Key to enter BIOS Setup Utility.
Step 3. Enter Boot option tab, and go to Boot device Priority item. On Boot device Priority item, choose USB drive or USB HDD as the first boot device.
Step 4. Press F10 to save the BIOS setting, and restart computer.
Example for setting your computer boot from USB drive:
1. UEFI BIOS (The newest BIOS)
1-1 Start computer (Eg. Asus) and press Del or UEFI key to enter UEFI BIOS Utility window.
1-2 Click Exit/Advanced button in the upper right side of window.
1-3 Choose Advanced Mode.
1-4 Choose Boot in sub-menu.
1-5 Turn to "1st Boot Device" by PgUp and PgDown buttons, and press Enter.
1-6 Select USB flash drive in pop-up dialog. Press Enter. It will be shown in "1st Boot Device" option.
1-7 Press F10 to save changes and exit. 
2. Phoenix Award BIOS
2-1 Press Del to enter BIOS setting screen while powering on computer.
2-2 Choose Advanced BIOS Features.
3-3 On the Advanced BIOS Features screen, choose Hard Disk Boot Priority.
2-4 Move USB device to the first place of Hard Disk Boot Priority by pressing “+” or “-“, press ESC back to the previous step.
2-5 Select First Boot Device.
There is no option such as USB-HDD, USB-ZIP, so choose Hard Disk as the first boot device.
3. Award BIOS (older)
3-1 Press Del and enter BIOS setting screen while powering on computer.
3-2 Choose Advanced BIOS Features.
3-3 On the Advanced BIOS Features screen, choose Hard Disk Boot Priority.
3-4 Move USB device to the first place of Hard Disk Boot Priority by pressing "+" or "-", press ESC back to the above step.
3-5 there are options like USB-HDD, USB-ZIP etc. Select Hard Disk or USB-HDD, USB-ZIP as the first boot device.
4. AMI BIOS
4-1 Press Del or other Bios Key to enter BIOS.
4-2 Press direction keys to move your mouse to BOOT.
4-3 Press up and down arrow keys to move mouse to Boot settings/Boot device Priority, and press Enter.
4-4 In Boot device Priority menu, press up and down keys to move mouse to 1st boot Device. And then press Enter.
4-5 Select Removable Device as the first boot device.
If you have not chosen USB device as the first boot device for Hard Disk Drives, there will not be USB device. But you can choose Removable Device as the first boot device. If you have set the first boot device for Hard Disk Drives, now you can select USB device as the first boot device directly.
4-6 Press F10 to save BIOS settings and exit.

Keys for various BIOS: 


Mainboard VendorLaptopDesktop computer
BrandBIOS KeysBrandBIOS/UEFI Keys BrandBIOS/UEFI Keys
AsusF2,DELLenovoF1, F2LenovoF1, F2
GigabyteF12AcerDEL, F2HPEsc, F10
MSIF11AsusDel, F2AcerDEL, F1, F2
BiostarF9HPEsc, F10, F1DellF2
SoyoESC or F12ThinkpadDel, F8, F1HaseeF12
ColorfulESC or F11DellF2AsusF9
AsrockF11HaseeF12FounderF12
OndaF11ToshibaF1, F2, ESC, F12Tsinghua TongfangF12
UNIKAESCSamsungF2, F10HaierF12
ASLF10IBMDelBenqF8
IntelF12SonyF1, F2, F3  
FoxconnESC or F12FujitsuF2  
GamenF11 or F12HaierF12  
TopstarF11 or F12FounderF12  
YestonF8Tsinghua TongfangF12  
CTHIMF12MSIF11  
JetwayESCBenqF9  
EliteESC or F11GigabyteF12  
MaxsunESCGatewayF1,F2  
  eMachinesF12  
 
Read More

How to Factory Reset a Samsung Laptop

12:34:00 AM |

Method one:
<1>. Press and hold on Esc key, and then start Samsung laptop
Note: Please don’t loosen your hand on Esc key until the Samsung laptop starts with restore system.
<2>. Find Samsung Recovery Solution program, and run it. Or Enter Menu window.
Note: Samsung Recovery Solution is system restore program provided by Samsung. Used for Samsung password recovery etc.
<3>. Press F11 to restore Samsung factory setting.
 Method two:
As we all know, Samsung laptop is taken with one function that Samsung factory reset with one key. Just start your Samsung laptop and press F4 or F7 at the same time. And Samsung laptop will run system restore program automatically. When the program runs over and reboot Samsung laptop, you can access Samsung laptop without any password.
Read More

How to Clear BIOS Password on Dell Computer

6:28:00 PM |

I have a server Dell 1950 needed to be reinstalled with Windows system. And when I start the server again to set up bios, I found BIOS is encrypted with password. How to do? - A question from computer forum. 

Generally, if our computer is usual compatible machine, maybe we just need to remove the battery or clear RTC. But for Dell computer, no matter your computer is taken with RTC or not, there is a PSWD jumper, also called password jumper. Only removing computer battery or clearing RTC would not relieve BIOS password.

So now let’s see how to clear BIOS password on Dell computer with following introduction.

At first, we have to consider PSWD. Because different PSWD has different needle, generally there are two or three needles, the way to clear BIOS password would be different according to PSWD.

Situation One: When PSWD is Two Needle

  1. Find out PSWD, and remove power line until main board led turn off.
  2. Remove jumper cap on PSWD, start Dell computer and you will hear the sound of drop. And BIOS password is removed or cleared.
  3. Shut down Dell computer and take back jumper cap to PSWD
  4. Restart computer, and you don’t need to enter BIOS password when you want to access BIOS setting screen. 

Situation Two: When PSWD is Three Needle

  1. Find PSWD, and remove power line until main board led turn off.
  2. Move jumper cap of PSWD from 1-2 needle to 2-3 needle, and start computer. You will hear sound of drop.
  3. Shut down computer and retrieve jumper cap of PSWD to 1-2 needle.
  4. Restart computer. Everything is OK.
Read More

Dell Administrator and BIOS Password Reset on Laptop/PC

6:27:00 PM |

Forgot administrator password on Dell Inspiron laptop? Lost BIOS password when you want to enter BIOS settings option on Dell computer?
Now let this passage tell you how to reset Dell admin password and how to remove or clear BIOS on Dell computer.

Question 1: How to Reset Dell Admin Password on Windows 7/8 Laptop

When we forgot Dell administrator password, we could consider it on different perspectives. And then you could find appropriate and effective password recovery ways to reset Dell administrator password. 
Now we could think that whether it is the only administrator on Dell computer. 
  • If not, just use another available administrator to login computer and change or remove forgotten admin password on Control Panel.
  • If it is, try to use password reset disk to recover Windows password firstly. But if you don’t have it, Dell administrator password reset would become a little difficult. 

Reset Windows 7/8 Dell Administrator Password without Disk

reset Dell administrator password without disk
For Windows 7/8, even though you have no reset disk, Windows administrator password reset still can be come true.  For example, password hint, PIN code, Microsoft account can be used to remind people of lost Windows password or login locked Dell laptop. When all these don’t work, you still could try the following three ways to reset Windows password without disk after Windows admin password forgot. 

1. System Reset Disk 

If you've forgotten Windows password, there are several utilities to reset it. One of them is Windows own System Recovery Disk. As a side note, this password reset trick, which takes just ten minutes to do, is a security hole in Windows 8 and earlier systems, which you can prevent an attacker from hacking into your computer with encryption.
All you need to reset the Windows password with this method is another Windows PC. So you can make the System Recovery Disk and burn it to a CD or USB thumb drive. 
Basically, you boot into the locked PC with the recovery disk and open up the command prompt, and then replace the Ease of Access Center application (utilman.exe) with another copy of the command prompt (cmd.exe) with administrative privileges. Then you use the "net user" command to type in a new password for the user whose password you want to reset.
Command: net user <user name> <user new password>

2. System Restore

Example: Use System Restore as Recovery Tool in Windows 8
When a change causes your system to act strangely, you can undo that change by performing a system restore operation. Now, you can restore system to early back up point in order to remove admin password. 
If Windows will not start, you can use the Recovery Drive to launch System Restore. If Windows does start, you can launch System Restore from within Windows.
To do so, access the System Protection tab and click the System Restore button. In a moment, System Restore will begin an initialization process and you'll then see the introductory screen in the wizard driven interface. After System Restore starts, you'll see the first screen in the wizard driven interface.
When you click Next, you'll see a table showing the most recent restore points. If you select the Show more restore points check box, you will see any older restore points that are still available.

3. Windows password recovery tool

The above two ways are related to Windows system, which seem to be a little difficult for general computer user to do so. So at this moment, I want to share easier Windows password recovery tool for you.
Windows Password Genius or Password Genius provides Windows password recovery function. Surely if you get Password Genius, it would not only reset Windows forgotten administrator password, but also recover Office and archives password. 
3-1 Download and install it on another accessible PC or laptop. 
3-2 Run it and choose Remove Windows administrator and user passwords. Now just get into it to burn a Windows password reset disk. 
remove windows administrator and user password
3-3 Insert bootable USB into computer and choose it to create password reset disk by clicking "Begin burning" button.
When it completes burning a reset disk, exit and plug it into locked Dell computer to set computer boot from USB drive. 
burn windows password reset disk
3-4 After you see Windows Password Genius runs, select Windows system and admin account. And then click Reset Password button to remove Windows admin password. 

Question 2: How to remove BIOS password on Dell computer?

Generally, when we want to remove BIOS password on computer, we just need to shut down computer and move battery from mainboard. But it is just applied to compatible computer. For Dell Computer, no matter your computer is taken with RTC or not, there is a PSWD jumper, also called password jumper. Only remove computer battery or clear RTC couldn’t relieve the password sometimes. 
So now let’s see how to clear BIOS password on Dell computer. 
First we have to make sure that PSWD has two or three needles. For different needle PSWD, the way to clear BIOS password is different.

One: When PSWD is Two Needle

<1> Find out PSWD, and remove power line until main board led turn off.
<2> Remove jumper cap on PSWD, start Dell computer and you will hear the sound of drop. And BIOS password is removed or cleared.
<3> Shut down Dell computer and take back jumper cap to PSWD
<4> Restart computer, and you don’t need to enter BIOS password when you want to access BIOS setting screen. 

Two: When PSWD is Three Needle

<1> Find PSWD, and remove power line until main board led turn off.
<2> Move jumper cap of PSWD from 1-2 needle to 2-3 needle, and start computer. You will hear sound of drop.
<3> Shut down computer and retrieve jumper cap of PSWD to 1-2 needle.
<4> Restart computer. Everything is OK.
Read More

How do I reset my computer back to factory default state (System Recovery)?

6:20:00 PM | , ,

Computers manufactured from mid 2007 are no longer provided with recovery disks for your operating system. To make your recovery data easier to access Toshiba are now providing your recovery media via a hidden partition that is built into your Hard Disk Drive. You can access this following the instructions below. 

You may still use your Recovery Disks to reinstall your computer back to your Factory Default Settings. Instructions are provided.

System Recovery from Hard Disk Drive
System Recovery from Disk


System Recovery from Hard Disk Drive 
For Windows 8.0 and 8.1 instructions please click here.

NOTE: Please ensure you have backed up all important information from your system before proceeding with this process. 

ALL DATA WILL BE ERASED ON YOUR HARD DRIVE IF YOU PROCEED. YOU WILL NEED TO ENSURE THAT YOU HAVE THE POWER ADAPTER PLUGGED IN. DO NOT SWITCH OFF OR RESTART YOUR COMPUTER DURING THIS PROCESS.

1. Hold down the power button for 10 (ten) seconds to switch off your machine.

Please note: Holding down the power button on the machine forces it to switch off. Any unsaved data will be lost. 

2. Press and hold the 0 (zero) key on top of the keyboard (not the zero key on the numeric keypad) and at the same time, press the power button once to switch on your notebook. 

3. When the Toshiba screen appears; release the 0 key.

4. If prompted select 32bit or 64bit operating system; click Next. 

For more information on the differences between 32bit or 64bit operating systems click here.

5. When prompted by the warning screen; click Yes to continue with the system recovery. 


6. Select Recovery of Factory Default Software; click Next. 


7. Select Recover to out-of-box state; Click Next again. 


8. Please read and acknowledge this last warning screen. 


9. Click Next to start recovery

Please note: Recovery times can vary depending on the model of computer and can take up to 2 1/2 hours to complete. During the recovery process your computer will display a screen saying “Preparing/Configuring your System, please wait” and will restart several times. This is all a normal part of the process and should not be interrupted.


System Recovery from Disk

NOTE: Please ensure you have backed up all important information from your system before proceeding with this process. 

ALL DATA WILL BE ERASED ON YOUR HARD DRIVE IF YOU PROCEED. YOU WILL NEED TO ENSURE THAT YOU HAVE THE POWER ADAPTER PLUGGED IN. DO NOT SWITCH OFF OR RESTART YOUR COMPUTER DURING THIS PROCESS.

1. Insert Recovery Disk 1 into CD/DVD Drive

2. Hold down the power button for 10 (ten) seconds to switch off your machine.

Please note: Holding down the power button on the machine forces it to switch off. Any unsaved data will be lost. 

3. Press and hold the C key and at the same time, tap the power button once to switch on your notebook. 

4. When the Toshiba screen appears; release the C key.

5. If prompted select 32bit or 64bit operating system; click Next. 

For more information on the differences between 32bit or 64bit operating systems click here.

6. When prompted by the warning screen; click Yes to continue with the system recovery.

7. Select Recovery of Factory Default Software; click Next.

8. Select Recover to out-of-box state; Click Next again.

9. Please read and acknowledge this last warning screen.

10. Click Next to start recovery.

Please note: If your computer requires more than one recovery disk you will be prompted to insert these as the computer needs them. When prompted insert the requested recovery disk and select Ok.

Recovery times can vary depending on the model of computer and can take up to 2 1/2 hours to complete. During the recovery process your computer will display a screen saying “Preparing/Configuring your System, please wait” and will restart several times. This is all a normal part of the process and should not be interrupted.
Read More

How to Change BIOS Password for Acer Laptop

6:18:00 PM | , , ,

“Not long ago, I set a BIOS password to my Acer laptop. Now, I find that it is difficult for me to remember it, so I would like to change it to a catchy one. Can anybody tell me how to change BIOS password?” I find the question in the Internet and would like to share my solution to it in this article.

The process of changing BIOS password for Acer laptop is as below.

Step 1: Start the laptop, immediately and repeatedly press F1 or Delete on the keyboard to enter the BIOS Setup Utility interface.
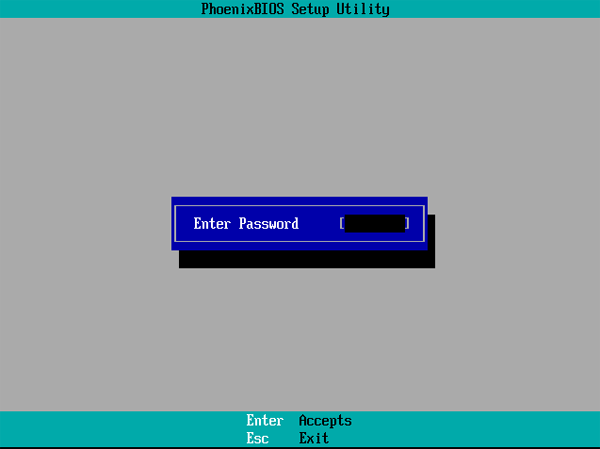
Step 2: Input the BIOS password (User Password) you set in the BIOS before, and click Enter to go on. In this step, please note that if you had created a Supervisor Password in BIOS before you set a user password, you must type in the supervisor password and press Enter. Otherwise, you can not make any changes to the BIOS setting, altering BIOS password included.
enter-original-password
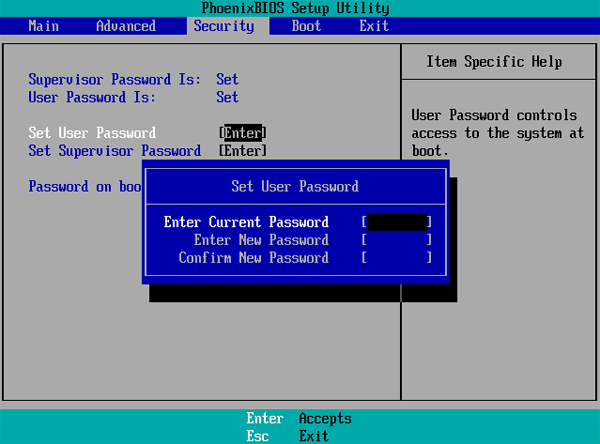
Step 3: Select Security by right arrow and press Enter to choose Set User Password. In the small interface, input the current password and press Enter to move on to the next, then type in new password and click Enter, and type the new code again and hit Enter.
reset-a-new-bios-password
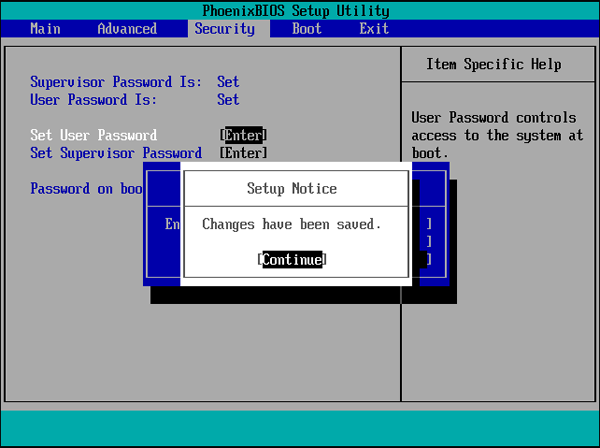
Step 4: As a Setup Notice informs that changes have been saved, press Enter to continue.
press-enter-to-continue
Step 5: Press F10 and Enter to save the configuration changes and exit. After this step, the BIOS password is successfully changed to the new code you just created.
click-yes-to-save-changes
After reading the content above, what do you think about this way? Is it easy for you to understand and apply? If you regard it as a good method, you can follow the procedure step by step to change you Acer laptop’s BIOS password now.
Read More